Proper replacement and tension adjustment of the timing belt is the key to long-term and stable engine operation. Even a minor mistake during installation can lead to a shift in timing phases, loss of power, or, in the worst-case scenario, severe damage to the cylinder head (CH).
In this technical manual, we will break down the step-by-step process of installing the crankshaft, camshaft, and injection pump (high-pressure fuel pump) drive wheel, as well as the rules for checking the belt tension for Andoria 4C90, 4CT90 engines.
Part 1. Checking Alignment Marks
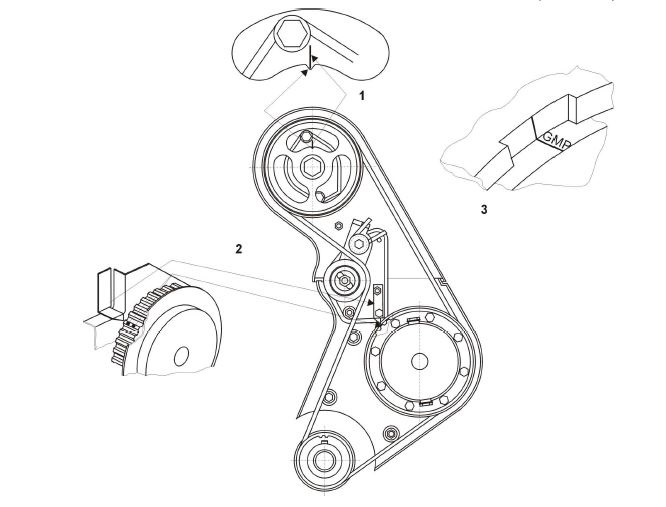
Before installing the timing belt and during the timing check, it is necessary to ensure the correct alignment of the key engine components according to the marks:
-
Correct installation of the camshaft: the mark on the gear (notch) must strictly align with the vertical groove in the camshaft frame.
-
Correct installation of the injection pump drive shaft: the mark on the injection pump drive wheel must align with the indicator arrow.
-
Correct installation of the flywheel to the GMP (TDC) position: the mark on the flywheel labeled GMP must align with the mark (notch) on the flywheel housing. (Note: the abbreviation GMP on the flywheel indicates the top dead center position).
Part 2. Procedure for Installation and Tensioning of the Timing Belt
Follow this sequence of actions during the kit installation:
-
a) Install the camshaft timing gear according to the alignment marks of the timing gear and the cylinder head nozzle.
-
b) Set the GMP mark flush with the line on the flywheel contour by turning the flywheel to the right.
-
c) Move the tensioner lever (roller) to the left and lock it by tightening the nut.
-
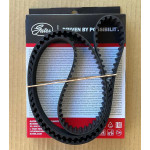
d) Install the timing belt and tension it while maintaining the timing adjustment as specified in points a, b, and c.
Important: it is critical to ensure that you do not change the relative alignment of the crankshaft, camshaft, and injection pump drive shaft. It is best to start installing the belt from the crankshaft timing gear. Then, lightly tensioning the belt, fit its teeth into the grooves of the selector wheel, and after that — onto the camshaft wheel. Finally, slide the timing belt onto the tensioner lever roller.
-
e) Loosen the nut securing the tensioner lever: the built-in spring should move the lever, creating belt tension. Due to the high natural resistance, it is recommended to additionally push the lever by hand.
-
f) Slightly tighten the nuts locking the tensioner levers (roller).
-
g) Manually rotate the crankshaft two full turns in the direction of engine rotation. Re-check if all alignment marks match. (Attention: if the marks do not match even by a millimeter, the timing belt installation procedure must be repeated from the very beginning!)
-
h) Finally, tighten the nuts securing the tensioner levers.
Part 3. Reference Tension Check
To ensure that the belt is neither over-tightened nor sagging, perform a final deflection test:
The timing belt is tensioned correctly if, under a force of 11.8 – 12.7 N (equivalent to 1.2 – 1.3 kg) applied to the belt exactly in the center of the span between the camshaft timing gear and the selector gear, it deflects by exactly 5 mm.
Compliance with these technical parameters will protect the belt from premature wear and the car engine from overhaul. Buy only high-quality, proven timing components, rollers, and tensioners for
Andoria 4C90, 4CT90 at the
AUTOStart-1 auto parts store to be confident in every journey!
How to quickly contact us and place an order:
- Text us via messengers: Click on the round widget button located in the bottom right corner of your screen. Choose your preferred chat — WhatsApp, Telegram, or Viber, and our manager will reply within minutes!
- Call us directly: +38 (098) 736-13-34 (click the number for a quick call from your mobile phone).
- Write to our Email: Send your inquiry or VIN-code to our email infoautostart1@gmail.com.
- More information: Find our full address, map, and working hours on the Contact Us page.
AUTOStart-1 - Start confidently every day! Always be the FIRST!!!

Andoria4C904CT902.4D,TD-150x150.jpg)